Task 1 - Practice Terminal Commands
Contents
Task 1 - Practice Terminal Commands#
For this task, you will be reproducing a particular directory structure with a series of files and folders, similar to what we did in class.
Installing Tree#
In case you missed the installation instructions to install tree, they are linked here:
On Windows, if you cannot find the tree command, please follow the instructions in the setup guide.
On Linux or macOS, you may need to install tree (if you didn’t already do it in the dungeon) with:
conda install -c conda-forge tree.
A. Create Directory Structure#
The files should be named the same way, but you can leave them empty if you want.
Hint: Start by creating a directory called Task1 in your lab directory, using the command:
mkdir Task1
If you followed the suggested directory structure, this directory should be here: ~/school/year3/data301/lab2-github-username/Task1
You may need the following commands:
B. Run tree#
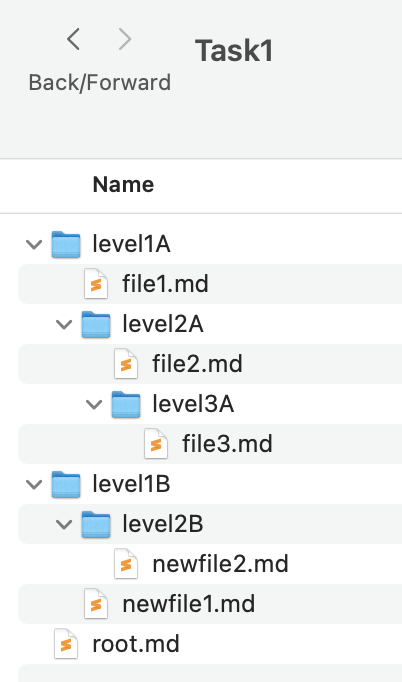
In this task (after you create the directory structure in Task 1A), we will use the tree command to output the directory structure inside your lab1 directory.
First, open a Terminal and run the following command inside your lab1 directory:
cd Task1
tree
You should get an output that looks something like this in your Terminal:
.
├── level1A
│   ├── file1.md
│   └── level2A
│       ├── file2.md
│       └── level3A
│           └── file3.md
├── level1B
│   ├── level2B
│   │   └── newfile2.md
│   └── newfile1.md
└── root.md

5 directories, 6 files
C. Save the output of tree to a file#
To redirect the output of any command into a file, you can use the > command.
Let’s do that for the tree command:
tree > directory_tree.txt
There should now be a new file in your Task1 directory called directory_tree.txt.
D. Add, commit, and push your changes to GitHub#
You are encouraged to commit, add and push intermediate changes in your repository, just remember to add a useful commit message.
git add .
git commit -m "Finished creating the directory structure."
git push
Note: Empty directories will not show up on GitHub.com so each directory must have a file in it (even if it is empty).
You are now ready to move on to Task 2!