DATA 530 Lab 1: Data Science stack
Name: FirstName LastName
Date: September 8, 2020
Objectives
Install the Data Science Stack
Become familiar with the tools of the trade
Learn how to submit labs in MDS using GitHub
Task #1 - Install the Data Science Stack (20 marks)
You’ll find the installation instructions here.
Once you’re finished installing everything, here is what you need to submit:
Create a new file in this lab1 folder and open it in VS Code:
code setup_script.shCopy the contents of this script and paste it into
setup_script.shSave the script (make sure it’s within this repository)
Run the following two commands in the cells beow. This is the output we will mark.
### If you're on macOS and using zsh, run the following two commands so your bash_profile is correctly read:

# !cp ~/.zshrc ~/.bashrc
# !cp ~/.zprofile ~/.bash_profile
!bash setup_script.sh
bash: setup_script.sh: No such file or directory
# This command prints your $PATH variable and lets us verify that your $PATH variable is reasonable and set correctly

!echo $PATH
/opt/hostedtoolcache/Python/3.7.9/x64/bin:/opt/hostedtoolcache/Python/3.7.9/x64:/home/linuxbrew/.linuxbrew/bin:/home/linuxbrew/.linuxbrew/sbin:/usr/share/rust/.cargo/bin:/home/runner/.config/composer/vendor/bin:/home/runner/.dotnet/tools:/snap/bin:/usr/local/sbin:/usr/local/bin:/usr/sbin:/usr/bin:/sbin:/bin:/usr/games:/usr/local/games:/snap/bin
### If you're on macOS and using zsh, you can now delete the files created above

# !rm ~/.bashrc
# !rm ~/.bash_profile
Task #2 - Install Microsoft Office 365 (5 marks)
UBC students have free access to a Microsoft Office 365 annual subscription, which is renewed for students enrolled in at least one course. Office 365 includes Word, Excel, PowerPoint, Outlook, and OneNote, and is available on a variety of platforms, including Windows, Mac, and Linux/Android.
To get your free Office 365 license and download the installer files, visit [UBC IT] (https://it.ubc.ca/services/desktop-print-services/software-licensing/office-365-students) and click Download Office 365. Note that you will need your CWL login credentials in order to download the software and activate your license.
Take a screenshot of the successful opening of Microsoft Excel to prove that you correctly installed it.
Solution
Your solution here

Task #3 - Submit this lab using GitHub (5 marks)
To submit the assignment using Git, follow these steps:
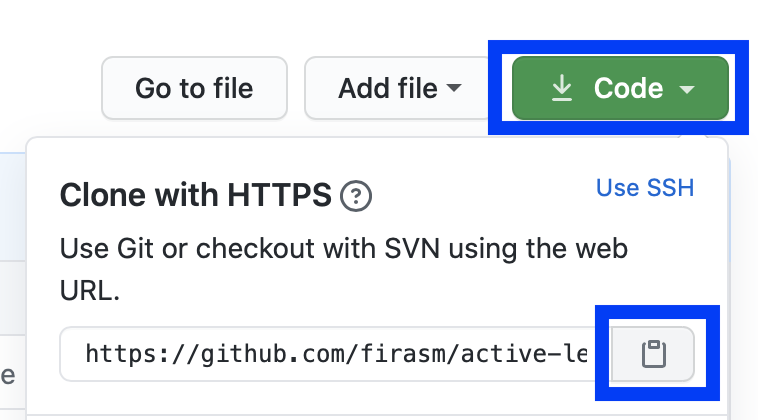
In GitHub, go to your automatically created lab repository, then click the
Clonebutton. Copy the https link in the dropdown box.
Open Terminal (Mac/Linux) or GitBash (Windows), and navigate to where you want to create your local copy of the repository.
Run
git clone <Your https repo link>. For example, I entergit clone https://github.com/ubco-mds-2020/<REPO_NAME>-firasm.git. You will be prompted to enter your GitHub username and password.Navigate into the new folder that has been created. Make your changes, adding or editing files to this new folder.
Note you may have already completed the following 2 steps when you installed the DS Stack. You do not need to do them again
Run
git config --global user.email "<Your Email you used for GitHub>"Run
git config --global user.email "<Your GitHub Username>"
Continue…
Run
git add -Ato stage all new edits and files in the repository for committing.Run
git commit -m "<Your commit message>"to make a local commit of your changes. Your commit message should be a short description of what changes were made. You just made your first commit!Run
git pushto push your local commit to the GitHub server. You may be asked for your GitHub username and password again. You should now see the changes you made reflected in GitHub’s web interface.You should repeat steps 7, 8, and 9 everytime you want to commit your changes up to GitHub.com. Otherwise they will only exist locally. I suggest having a minimum of 4 commits in this lab to get some practice on how this works.
Appendix
Useful Terminal Commands
You can use the terminal to navigate through your computer’s file system and run various applications. Windows users should use Git Bash (search for it in Start Menu), while Mac/Linux Users should open their terminals. Here are some useful commands that you should be familiar with (try them out!):
pwd- shows the path of your current directory (i.e. tells you where you are) on Windows, the terminal prompt contains the path of your current directorylsshows what is in the current directorycd <directory or path>- change directory to the specified directory (NOTE: the use of the greater than and less than signs are meant to indicate that you need to type in whatever directory or path you want to go to. You should not literally type in these symbols into the terminal)cd ..goes up one level, to the parent folderextra tip: TAB does autocomplete for file names (start typing the name of a file/folder and press TAB before you finish typing)
You can use the symbol
~as shorthand for your home directory. So for examplecd ~/Desktopwill probably get you to your desktop if you’re on Mac/Linux. Note: This references an absolute path rather than a relative path – it points directly to your home directory regardless of what directory you are currently in, rather than some place relative to the current directory you are in. The rest of the time when you use cd to navigate around you are usually specifying relative paths (path relative to where you are right now).
Chose a folder where you want to save your work for this assignment.
Open Atom, and write the following code:
print test successful!and then go to File -> Save As and save the file with the extensiion.pyin the directory you chose. For example, I saved the file as test.py.Now, in terminal, navigate to that folder using the commands you learned above.
Once you are there, type:
python <program name>.py. In this case, we typepython test.py. You should now seetest successful!in your terminal.
You can do a lot more with a terminal. See software carpentry’s resources on this.
Documentation
The following resources will be very helpful in explaining how to work with the required languages and environments.
Troubleshooting
A lot of troubleshooting questions are answered on Stack Overflow. We encourage you to use Stack Overflow throughout the program.
Attributions
UBC STAT 545 licensed under the CC BY-NC 3.0.