Windows Software Stack#
Tip
Before starting, I suggest updating your Windows operating system to the latest version your laptop can run:
See here on how to update your Windows 11 machine to the latest version.
These instructions will walk you through installing the required Data Science software stack for this project. Before starting, ensure that your laptop meets the minimum requirements listed here.
If your computer does not meet any of the requirements above, let me know first and we can discuss alternate possibilities so you can still participate.
Installation notes#
Unless you really know what you are doing, if you have already installed Git, Conda, or any of the Python related packages below, I strongly advise you to please uninstall these and follow the instructions below to re-install and configure them correctly (make sure to also remove any user configuration files and backup them if desired). In order to be able to support you effectively and minimize setup issues and software conflicts, we suggest students to install the software stack the same way (even though there are better ways).
In all the sections below, if you are presented with the choice to download either a 64-bit (also called x64) or a 32-bit (also called x86) version of the application always choose the 64-bit version.
Once you have completed these installation instructions, make sure to follow the post-installation notes at the end to check that all software is setup correctly.
Table of Contents#
Zoom#
We will be using Zoom for this project for our meetings. It is very important that you have the most recent version of Zoom installed, as we will be using many of the features that are only available in more recent versions.
The latest version of Zoom as of May 2023 is: 5.14.6 (17822).
You can ensure you have the latest version of Zoom by clicking “Check for Updates” as shown in the screenshot below (on a Windows machine, your screenshot will look slightly different).

Important
Please note that if you have been relying on the “web version” of Zoom that works only in a browser, this will not work for this project! Please make sure to download the Zoom desktop client for your operating system to fully participate in the course.
Mattermost#
Once students have joined the team, for team communication and coordinating, we will be using Mattermost. Mattermost is an open source tool that has functionality similar to enterprise tools such as Slack, Hipchat, Ryver, etc…
Once you have been accepted into the team, you will receive a URL (via email) you can use to join the Mattermost Team. Click that link to accept the invitation, create an account, and download the desktop and mobile apps (https://mattermost.com/download/#mattermostApps) so you can stay connected to the projects.
You will need the following server information:
Server URL: https://moosvilab.ok.ubc.ca
Server Display Name:
MoosviLab
Tour of Mattermost#
Channels in Mattermost
Mattermost Mobile
Threads in Mattermost#
In most cases you should be using Threads whenever you’re replying to a message, that helps keep things organized. When you want to start a new conversation, you can post a new message in the appropriate channel (avoid duplicate posting), and the expectation is others will respond to your message in threads. Don’t worry about posting too much or bothering others - this tool is only being used by our team!

Your bio#
Once you’ve gotten the hang of Mattermost by watching the videos above, you’re ready to send your first message!
In the oer-introductions channel, upload a reasonably professional picture of yourself and a short (150-200 words) bio/paragraph that you are comfortable sharing publicly.
You can see the previous examples of former students there.
This will go up on the project website here.
In addition to the bio, feel free to also say hi and chat with the other project team members on Mattermost!
GitHub.com account#
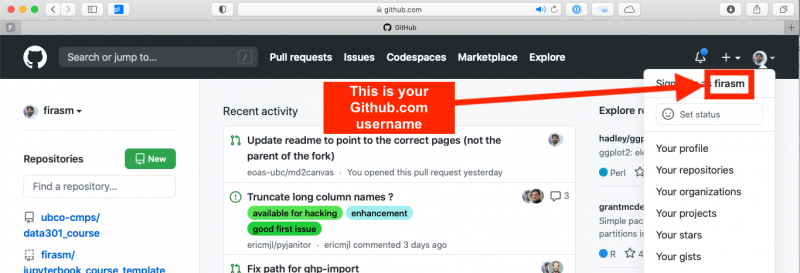
Sign up for a free account at GitHub.com if you don’t have one already. Your GitHub username is important, here’s how to find your username:
Visual Studio Code#
The open-source text editor Visual Studio Code (VS Code) is both a powerful text editor and a full-blown Python IDE, which we will use for more complex analysis. You can download and install the Windows version of VS Code from the VS code website https://code.visualstudio.com/download. Once the download is finished, double click it to open and follow the installation instructions. Make sure you are able to open VS Code by clicking on the application.
VSCode extensions#
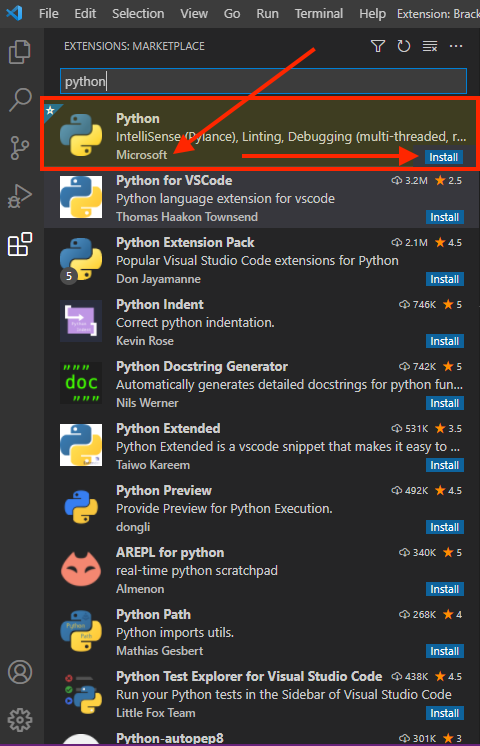
The real magic of VS Code is in the extensions that let you add languages, debuggers, and tools to your installation to support your specific workflow. Now that we have installed all our other Data Science tools, we can install the VS Code extensions that work really well with them. From within VS Code you can open up the Extension Marketplace (read more here) to browse and install extensions by clicking on the Extensions icon in the Activity Bar indicated in the figure below.

To install an extension, you simply search for it in the search bar, click the extension you want, and then click “Install”. There are extensions available to make almost any workflow or task you are interested in more efficient! Here we are interested in setting up VS Code as a Python IDE. To do this, search for and install the following extensions:
Python(by Microsoft)Path Intellisense(by Christian Kohler)EditorConfig for VS Code(by editorconfig.org)Code Spell Checker(by Street Side Software)indent-rainbow(by oderwar)isort(by Microsoft)
This video tutorial is an excellent introduction to using VS Code in Python.
Terminal (GitBash)#
Attention
If you have Windows Terminal already installed on your system, you can also use that, but it’s not fully supported because I don’t have a windows machine to test it with! A PR is welcome to add instructions on installing Git and Python on Windows Terminal!
Unfortunately, one of the major problems with using the Windows operating system is that the “Command Prompt” that comes with the operating system is severely deficient. No worries though, luckily most of the tools we use in this course are open source, so the community has worked hard to shore up deficiencies in the Microsoft ecosystem (until Windows subsystem for Linux is a more mature product).
The replacement for the Command Prompt we will use in this project is called “GitBash”.
The latest version of GitBash for Windows is: 2.40.1.
Attention
“GitBash” is relatively old software, but it is very reliable and works very well.
If you are feeling brave and want to setup zsh (the next generation Terminal, with many improvements) on Windows, you can try these instructions here.
Note that these instructions are experimental and support from the teaching team is limited. But if you can get it to work or run into any issues, let me know.
Briefly, we will be using the Bash shell to interact with our computers via a command line interface, and Git to keep a version history of our files and upload to/download from to GitHub.
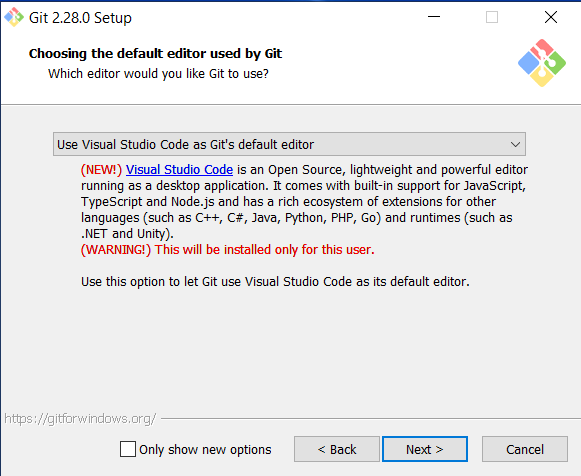
Go to https://git-scm.com/download/win and download the windows version of GitBash. After the download has finished, run the installer and accept the default configuration for all pages except for the following:
On the Choosing the default editor used by Git page, select “Use Visual Studio Code as Git’s default editor” from the drop-down menu’
Optional On the Select Components page, check “On the Desktop” under “Additional icons”.
Note
If you wish to pin Git Bash to the taskbar, you need to search for the program in the start menu, right click the entry and select “Pin to taskbar”. If you instead first launch the program and pin it by right clicking on the taskbar icon, Git Bash will open with the wrong home directory (/ instead of /c/users/$USERNAME.
Note
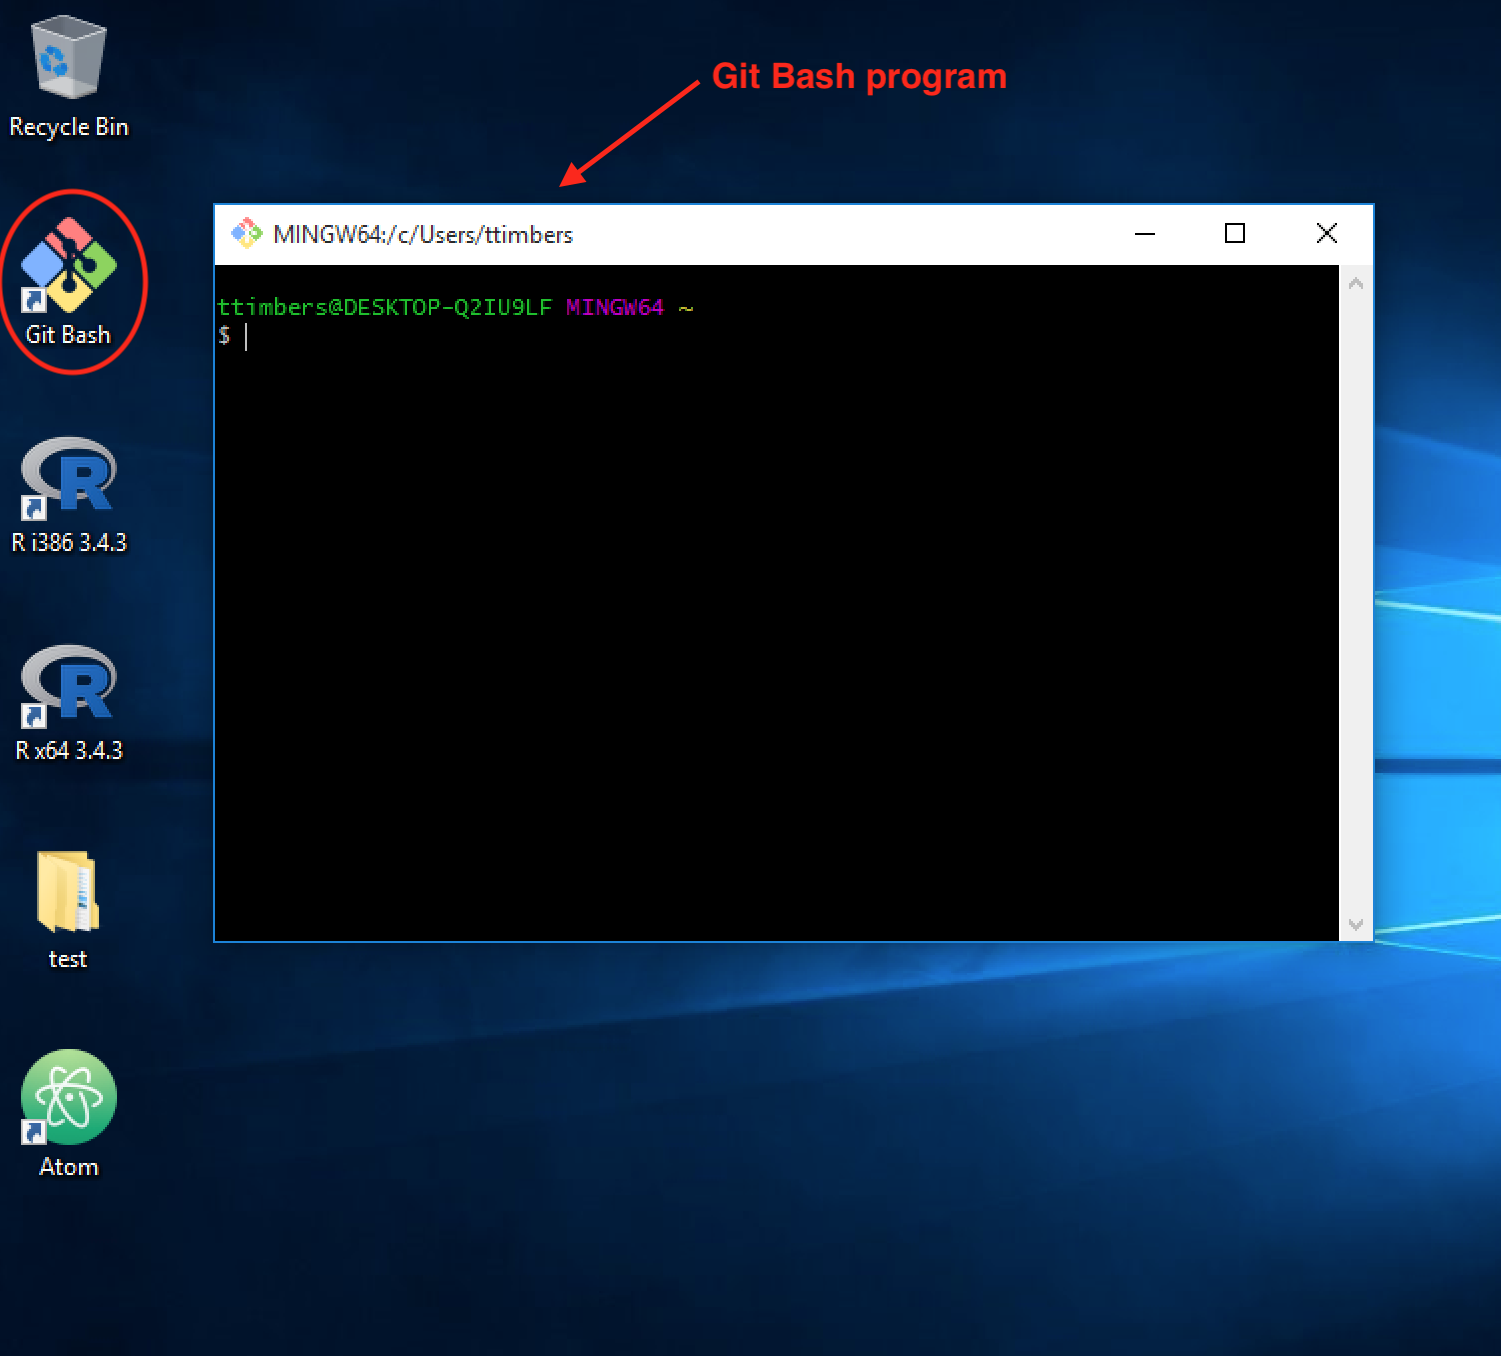
After installation, test if you were successful by opening the GitBash program. Below is a picture of the Git Bash icon on the Desktop and an opened instance of the Git Bash terminal (we will often refer to this as just the “Terminal”). From now on, all commands should be entered into the GitBash program (not Anaconda Command Prompt, or Command Prompt, or PowerShell etc…).
In the terminal, type the following to check which version of Bash you just installed:
bash --version
The output should look similar to this:
GNU bash, version 4.4.23(1)-release (x86_64-pc-sys)
Copyright (C) 2019 Free Software Foundation, Inc.
License GPLv3+: GNU GPL version 3 or later <http://gnu.org/licenses/gpl.html>

This is free software; you are free to change and redistribute it.
There is NO WARRANTY, to the extent permitted by law.
If you tried to paste the above into the Git Bash terminal, you will have noticed that
Ctrl+Vdoes not work in Git Bash. Instead you need to right click and select “Paste” or use theShift+Insertshortcut. To copy from the Git Bash terminal you simply select the text you want and it is copied automatically.
Via right click you can also reach the settings menu where you can configure Git Bash to your preferences, a couple of tips would be to check “Mouse -> Clicks place command line cursor” and change the font to something more legible, e.g. Consolas (“Text -> Select”).
Let’s also check which version of git was installed:
git --version
git version 2.32.0.windows.1
Python#
We will be using Python for a large part of the course, and conda will be our Python package manager.
Installing conda and python#
We will be using Python for a large part of the program, and conda as our Python package manager.
To install Python and the conda package manager, we will use the Miniconda platform (read more here), for which the Python 3.9 (or higher) 64-bit version can be downloaded here.
Miniconda also provides us with a minimum number of useful packages so installation is quick, and relatively painless.
After the download has finished, run the installer and accept the default configuration for all pages.
Warning
Make sure to check the box to add Miniconda to the PATH. There is a big scary warning that says this is “Not Recommended” ; you can ignore that warning, and make sure that checkbox is clicked!
After the installation is complete, open the Start Menu and search for the program called “Anaconda Prompt (miniconda3)”.
When this opens you will see a prompt similar to (base) C:\Users\your_name.
Type the following to check that your Python installation is working:
python --version
which should return something like this:
Python 3.9.5
If instead you see
Python 2.7.Xyou installed the wrong version. Follow these instructions to delete this installation and try the installation again, selecting Python 3.9.
Integrating Python with the Git Bash terminal#
Warning
This part is very important!!!
To avoid having to open the separate Anaconda Prompt every time we want to use Python, we can make it available from the (Git Bash) terminal, which is what we will be using most of the time. To set this up, open the “Anaconda Prompt (miniconda3)” again and type:
conda init bash
You will see that this modified a few configuration files, which makes conda visible to the terminal. Close all open terminal windows and launch a new one, you should now see that the prompt string has changed to include the word (base) as in the screenshot below:
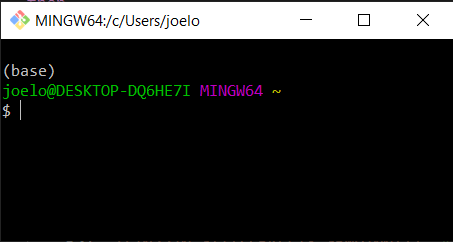
If you type
python --version
you should now see the same output as above (you may see a higher version of python, that’s fine:
Python 3.9.5
Note that if you want to run Python interactively from the Git Bash terminal, you need to prepend the
winptycommand, so the full command would bewinpty python(if you run this, note that you can exit the Python prompt by typingexit()). Running justpythonworks on other setups, but will freeze the Git Bash terminal.
Let’s also check the version of the conda package manager. If you type
conda --version
you should see something like this
conda 4.12.0
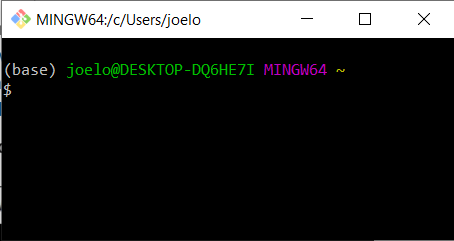
Optional One annoyance with our current terminal setup is that the word
(base)is not on the same row as the rest of the prompt string (the part withyour_name@your_computer. To fix this we can edit the.bash_profileconfiguration file to indicate that we do not want a newline at the beginning of the prompt string. Open up the configuration file using VS Code by typing the following command into a terminal:code "/c/Program Files/Git/etc/profile.d/git-prompt.sh"Delete the line that reads the following (it should be line 13):
PS1="$PS1"'\n' # new lineClick to save the file, when VS Code prompts you that the saving failed, click “Retry as Admin” and then “Yes”. That’s it! Now if you launch a new terminal instance, you will see
(base)on the same line as the rest of the prompt string as in the screenshot below.
Essential Python packages#
conda installs Python packages from different online repositories which are called “channels”.
A package needs to go through thorough testing before it is included in the default channel, which is good for stability, but also means that new versions will be delayed and fewer packages are available overall.
There is a community-driven effort called the conda-forge (read more here), which provides more up-to-date packages.
To enable us to access the most recent versions of the Python packages we are going to use, we will add this channel.
To add the conda-forge channel type the following in a Terminal window:
conda config --add channels conda-forge
To install packages individually, we need to use the following command: conda install -c conda-forge "<package-name>".
The part about conda install tells the conda package manager to install a particular package, and the -c part is an extra “option” that tells conda to look in the conda-forge channel (which usually has the latest updated packages).
Let’s install the key packages needed (you will note that we’re also specifying certain versions of the package with = X.Y).
You should copy and paste each line below in your Terminal to install the following packages:
conda install -c conda-forge black
conda install -c conda-forge nbconvert
conda install -c conda-forge seaborn
conda install -c conda-forge pandas
conda install -c conda-forge numpy
conda install -c conda-forge jupyterlab
conda install -c conda-forge pre-commit
conda will show you the packages that will be downloaded, and you may need to press enter or Y (for yes) to proceed with the installation.
We are specifying that we should use the “conda-forge” source because it typically has more recent and updated package versions.
This may take a while to complete.
Packages not yet available on conda#
There are some packages that we need for this project that are not available on the conda package manager, so let’s use pip to install them:
pip install problem_bank_scripts --upgrade
pip install problem_bank_helpers --upgrade
R, IRkernel, Rtools, and RStudio#
R is another programming language that we will be using a lot in this project, particularly for the Data Science and Statistics problem banks. We will use R both in Jupyter notebooks and in RStudio.
R#
Go to https://cran.r-project.org/bin/windows/base/ and download the latest version of R for Windows (4.0.2 at the time of writing). Open the file and follow the installer instructions accepting the default configuration.
After the installation is complete, we will add the R executables to the PATH variable in terminal so that you can use it without typing the full path to R each time. Open a terminal and type:
code ~/.bash_profile
Append the following line to the file
# Add R and Rscript to PATH
export PATH="/c/Program Files/R/R-4.0.2/bin/x64":$PATH
Then save the file and exit VS Code. Now you can open terminal and type
R --version
which should return something like:
R version 4.2.3 (2023-03-15) -- "Taking Off Again"
Copyright (C) 2020 The R Foundation for Statistical Computing
Platform: x86_64-w64-mingw32/x64 (64-bit)

R is free software and comes with ABSOLUTELY NO WARRANTY.
You are welcome to redistribute it under the terms of the
GNU General Public License versions 2 or 3.
For more information about these matters see
https://www.gnu.org/licenses/.
Note: Although it is possible to install R through Anaconda, we highly recommend not doing so. In case you have already installed R using Anaconda you can remove it by executing
conda uninstall r-base.
RStudio#
Download the Windows version of RStudio from https://www.rstudio.com/products/rstudio/download/preview. Open the file and follow the installer instructions.
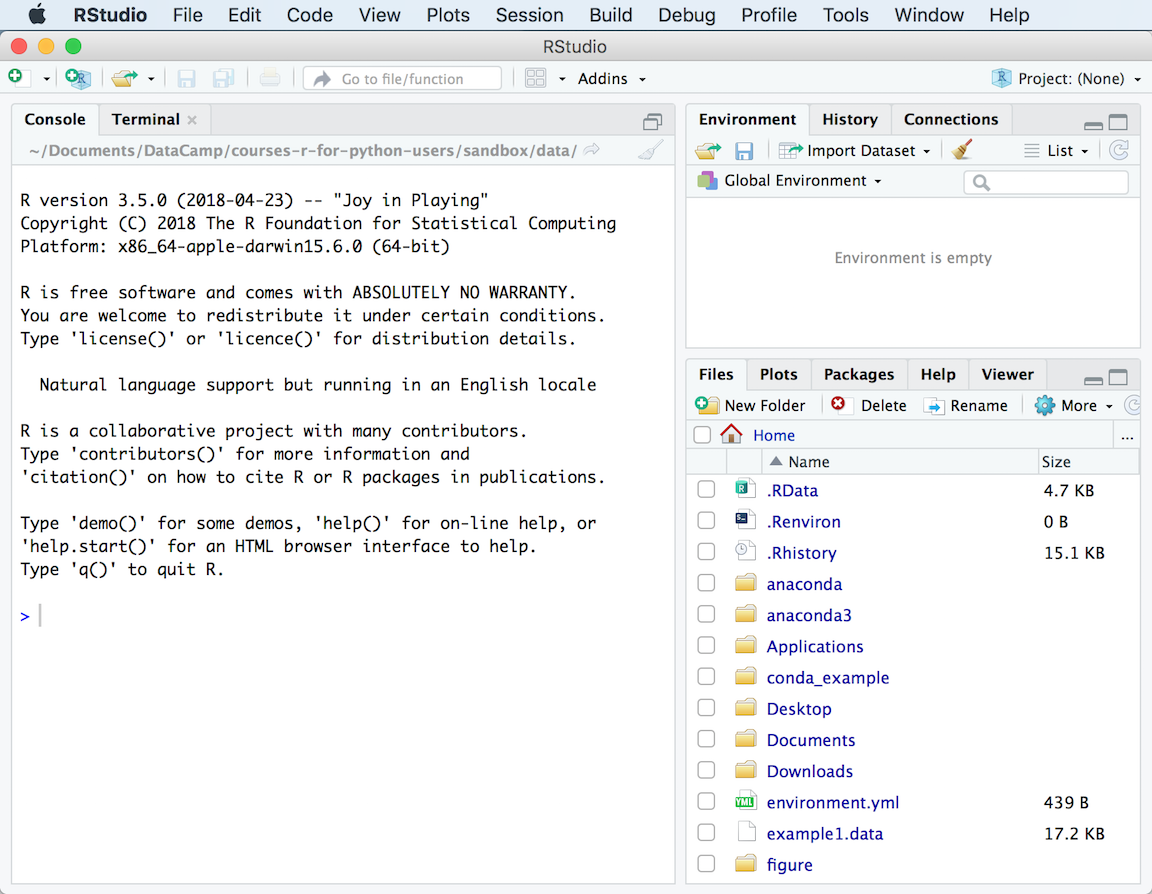
To see if you were successful, try opening RStudio by clicking on its icon. It should open and looks something like this picture below:
Next, we will make sure that Rstudio uses the same directories as R from terminal for its configuration. To do this, we will need to set an environmental variable in Windows. First, open the start menu, type “env” and select the match that reads “Edit the system environment variables”. Click the button at the bottom that reads “Environmental Variables…”:
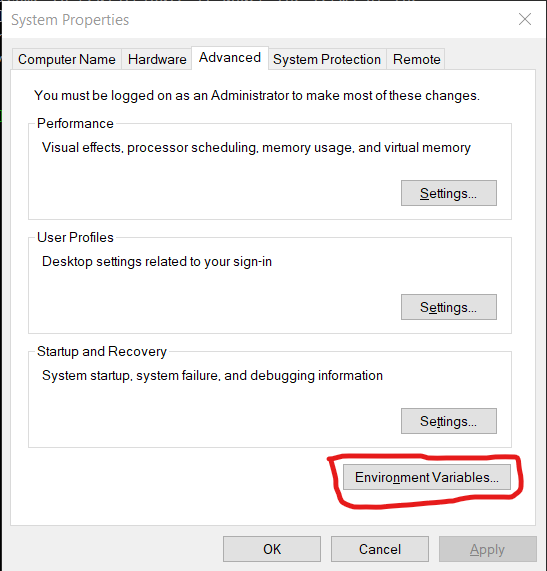
Under “User variable” click the “New…” button:
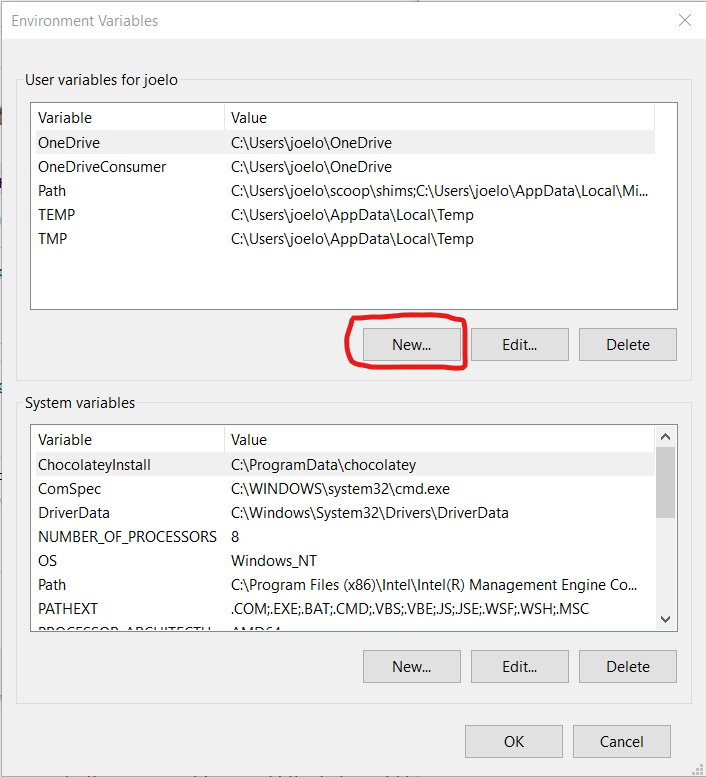
And type in R_USER as the “Variable name” and C:\Users\username as the “Variable value”, replacing username with your actual user name (if you don’t know your user name, look at the top of the screenshot above where it says “User variables for your_username”):

Click “OK” on all of the three windows we opened above and you’re done! If you open RStudio and R from terminal and type
.libPaths()
both should return the same values, e.g.
"C:/Users/joelo/R/win-library/4.0" "C:/Program Files/R/R-4.0.2/library"
Rtools#
Windows users will also need to install Rtools, which will allow you to use external libraries. Go to http://cran.r-project.org/bin/windows/Rtools/ and download the latest version (e.g., Rtools40.exe). After the download has finished, run the installer with the default configuration. Do not follow the Rtools’ website instructions for “Putting Rtools on the PATH”. RStudio will put Rtools on the PATH automatically when it is needed.
To test if you’re installation was successful, open RStudio and type the following into the Console:
install.packages("jsonlite", type = "source")
If the jsonlite package installs without errors, Rtools is setup correctly.
Essential R packages#
Next, install the key R packages needed for the start of MDS program, by opening up RStudio and typing the following into the R console inside RStudio:
install.packages(c('tidyverse', 'blogdown', 'xaringan', 'renv', 'devtools', 'usethis'))
If you get a prompt asking if you want to install packages that need compilation from sources, click “Yes”.
Note: we will use many more packages than those listed above across the MDS program, however we will manage these using the
renvpackage manager (which you will learn about in DSCI 521: Platforms for Data Science).
IRkernel#
The IRkernel package is needed to make R work in Jupyter notebooks. To enable this kernel in the notebooks, open R from a terminal and run the setup via the following two commands:
install.packages('IRkernel')
IRkernel::installspec()
When asked to select a mirror, pick one at a location close to where you live for faster downloads.
Note that you cannot use RStudio for this step because it will not be able to find the jupyter installation. R from terminal will since the correct PATH for jupyter is set when the terminal is launched.
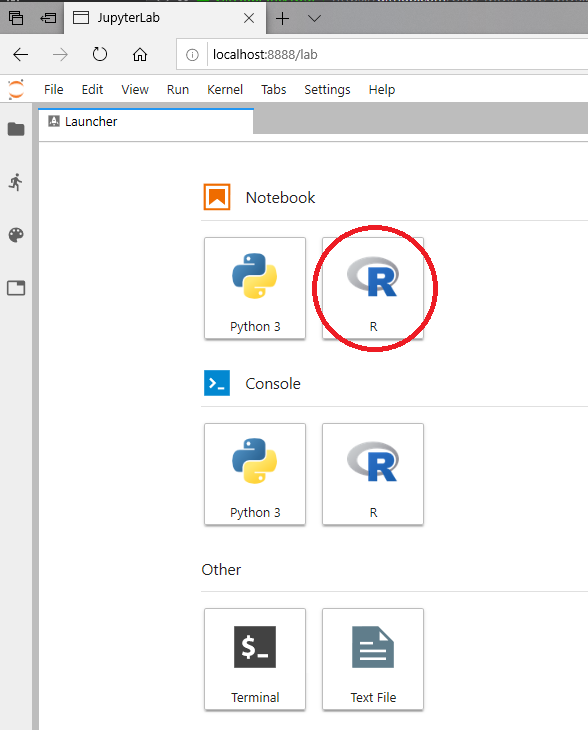
To see if you were successful, try running JupyterLab and check if you have a working R kernel. To launch the JupyterLab type the following in the terminal:
jupyter lab
A browser should have launched and you should see a page that looks like the screenshot below. Now click on “R” notebook (circled in red on the screenshot below) to launch an JupyterLab with an R kernel.
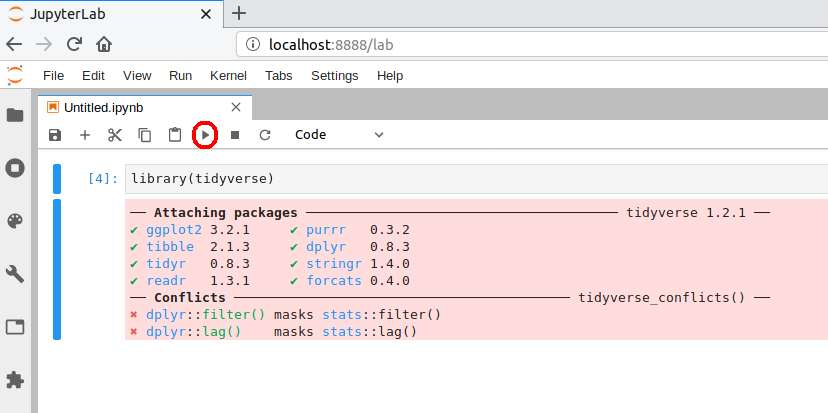
Sometimes a kernel loads, but doesn’t work as expected. To test whether your installation was done correctly now type library(tidyverse) in the code cell and click on the run button to run the cell. If your R kernel works you should see something like the image below:
To improve the experience of using R in JupyterLab,
we will add an extension that allows us to setup keyboard shortcuts for inserting text
(thanks to former MDS student Ryan Homer for developing this extension!).
By default,
it creates shortcuts for inserting two of the most common R operators: <- and %>%.
Run the following from terminal to install the extension:
jupyter labextension install @techrah/text-shortcuts
jupyter lab build
To check that the extension is working,
open JupyterLab,
launch an R notebook,
and try inserting the operators by pressing Alt + - or Shift + Ctrl + m, respectively.
Git and GitHub#
We will use the publicly available GitHub.com.
You should already have your GitHub.com username, you will need that for this question.
Install Git on your computer#
Although Git and GitBash are two separate programs, Git is packaged with GitBash and so you’ve already installed it. Time to configure it.
Configuring Git user info#
Next, we need to configure Git by telling it your name and email. To do this type the following into the Terminal (the same ones you used to sign up for GitHub):
git config --global user.name "YOUR NAME HERE"
git config --global user.email YOUR@EMAIL.com
Note
To ensure that you haven’t made a typo in any of the above, you can view your global Git configurations by either opening the configuration file in a text editor (e.g. via the command code ~/.gitconfig) or by typing git config --list --global.
Create your GitHub “Personal Access Token”#
This is a bit tricky, so please make sure you follow these directions carefully.
Create a classic Personal Access Token on GitHub.com by clicking this link: settings/tokens.
Add a short description (OPB project is probably fine).
Check the “repo” box and the “workflow” and the “admin” boxes.
Click “Generate Token” and make sure to COPY the token that they give you and save it somewhere secure (like a password manager), it is basically a special password that you can use in the Terminal. Save this token somewhere on your computer, you will need it when you clone a private repository to your computer.
Tip
Don’t share your token with anyone and protect it like it’s your password! You will not be able to come back to this page to get your token. If you forget it, or lose it, you can just delete the token and create another one.
Clone your first repository on your computer!#
Open a GitBash Terminal window, and then run the following command:
git clone https://github.com/firasm/test.git
Hopefully, if things work, you should be able to see a new folder created at that location. We will be talking more about what exactly you did over the next week and a bit, don’t worry!
Tip
If after running the code above, you see the error message:
fatal: destination path ‘test’ already exists and is not an empty directory.
It means that you already attempted a clone before, and there is already a directory called test where you are trying to clone this repository.
You will first need to delete that directory to try again.
Open an Explorer window on your computer, navigate to the directory, right click the test directory, and then delete the directory.
Alternatively, from the command line you can try:
rm -rf test
which will “remove” the directory called “test”. The “-” is to specify additional options: r means “recursively” for all the files in the directory, and f means “force” which means don’t ask me for confirmation after deleting each file and folder.
Launch VS Code from GitBash#
You can launch many windows programs from the Bash terminal, e.g. to launch VS Code that we installed previously, you would type in code, let’s use this to check the version of vscode that we installed:
code --version
1.78.2
b3e4e68a0bc097f0ae7907b217c1119af9e03435
x64
Setting VS Code as the default editor#
To make programs run from the terminal (such as git) use VS Code by default, we will modify ~/.bash_profile. First, open it using VS Code:
code ~/.bash_profile
Note: If you see any existing lines in your
~/.bash_profilerelated to a previous Python or R installation, please remove these.
Append the following lines:
# Set the default editor for programs launch from terminal
EDITOR="code --wait"
VISUAL=$EDITOR  # Use the same value as for "EDITOR" in the line above
Then save the file and exit VS Code.
Most terminal programs will read the
EDITORenvironmental variable when determining which editor to use, but some readVISUAL, so we’re setting both to the same value.
Tree#
From the Tree for Windows page, “Tree is a recursive directory listing program that produces a depth indented listing of files.” This is very useful to explore your directory and file structure to figure out which files are where.
Unfortunately, Tree is not trivial to install on Windows, but it is definitely worth the 2-3 minutes it takes to install it.
The steps in detail are outlined here (with screenshots).
In brief, the steps are:
Download the Tree binaries
Unzip the file, and navigate to the
bindirectory, and findtree.exe.Move or copy the
tree.exefile to this location:C:\Program Files\Git\usr\bin.Restart GitBash and type in
tree.
Test JupyterLab#
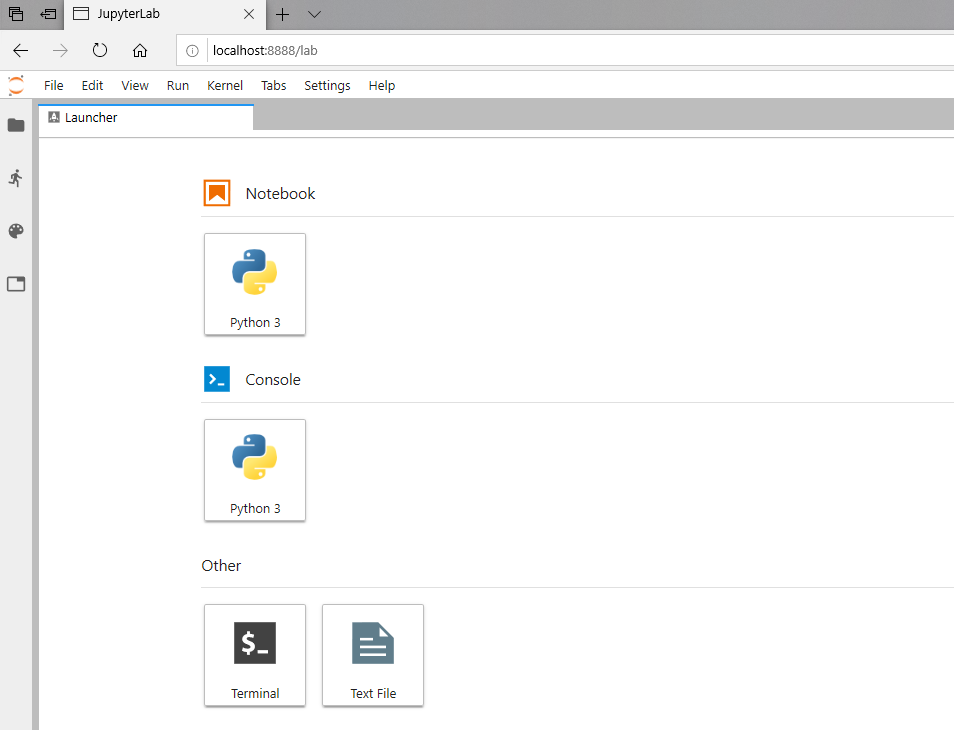
To test that your JupyterLab installation is functional, open a new Terminal window.
Then type jupyter lab and then hit enter.
This should open a new tab in your default browser with the JupyterLab interface.
To exit out of JupyterLab you can click File -> Shutdown,
or go to the terminal from which you launched JupyterLab and hold Ctrl while pressing c twice.
You should see something like this in your browser:
You’re all done!
Docker#
You will also need to install Docker for this project. It’s free but you will need at least 25 GB of free space on your machine.
On Windows download it here
There are some specific Windows version requirements, be sure to read the requirements carefully and ensure you meet either the WSL 2 backend or the Hyper-V backend
To confirm Docker is working, open a Terminal and run the following:
docker --version
You should get an output similar to:
Docker version y.y.y, build yyyyy
We will configure Docker in a later section.
Attributions#
UBC STAT 545 licensed under the CC BY-NC 3.0.
Important
These instructions have been adapted and remixed from the original version provided by the UBC-Vancouver MDS Install stack under a CC-BY-SA 4.0 license. They were originally written by Anmol Jawandha but have since been updated by Firas Moosvi, Joel Ostblom, Tomas Beuzen, Rodolfo Lourenzutti, & Tiffany Timbers, and others.
