Windows Software Stack Part 2
Contents
Windows Software Stack Part 2#
R, IRkernel, Rtools, and RStudio#
R is another programming language that we will be using a lot in the MDS program. We will use R both in Jupyter notebooks and in RStudio.
R#
Go to https://cran.r-project.org/bin/windows/base/ and download the latest version of R for Windows (4.1.1 at the time of writing). Open the file and follow the installer instructions accepting the default configuration.
After the installation is complete, we will add the R executables to the PATH variable in terminal so that you can use it without typing the full path to R each time. Open a terminal and type:
code ~/.bash_profile
Append the following line to the file
# Add R and Rscript to PATH
export PATH="/c/Program Files/R/R-4.1.1/bin/x64":$PATH
Then save the file and exit VS Code. Now you can open terminal and type
R --version
which should return something like:
R version 4.1.1 (2021-08-10) -- "Kick Things"
Copyright (C) 2021 The R Foundation for Statistical Computing
Platform: x86_64-apple-darwin20.4.0 (64-bit)

R is free software and comes with ABSOLUTELY NO WARRANTY.
You are welcome to redistribute it under the terms of the
GNU General Public License versions 2 or 3.
For more information about these matters see
https://www.gnu.org/licenses/.
Note: Although it is possible to install R through Anaconda, we highly recommend not doing so. In case you have already installed R using Anaconda you can remove it by executing
conda uninstall r-base.
RStudio#
Download the Windows version of RStudio from https://www.rstudio.com/products/rstudio/download/preview. Open the file and follow the installer instructions.
To see if you were successful, try opening RStudio by clicking on its icon. It should open and looks something like this picture below:

Next, we will make sure that Rstudio uses the same directories as R from terminal for its configuration. To do this, we will need to set an environmental variable in Windows. First, open the start menu, type “env” and select the match that reads “Edit the system environment variables”. Click the button at the bottom that reads “Environmental Variables…”:
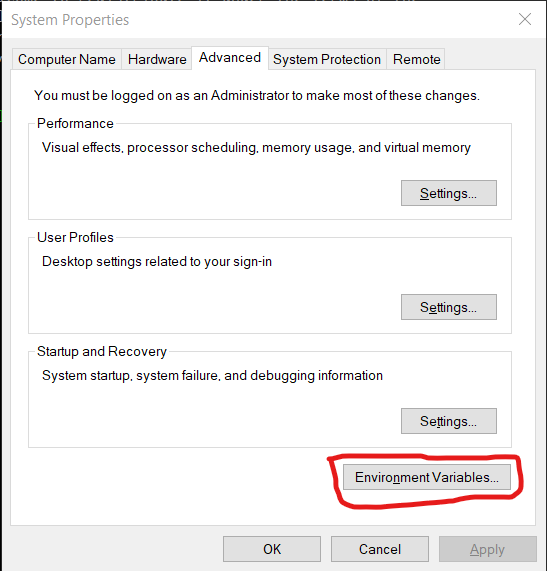
Under “User variable” click the “New…” button:
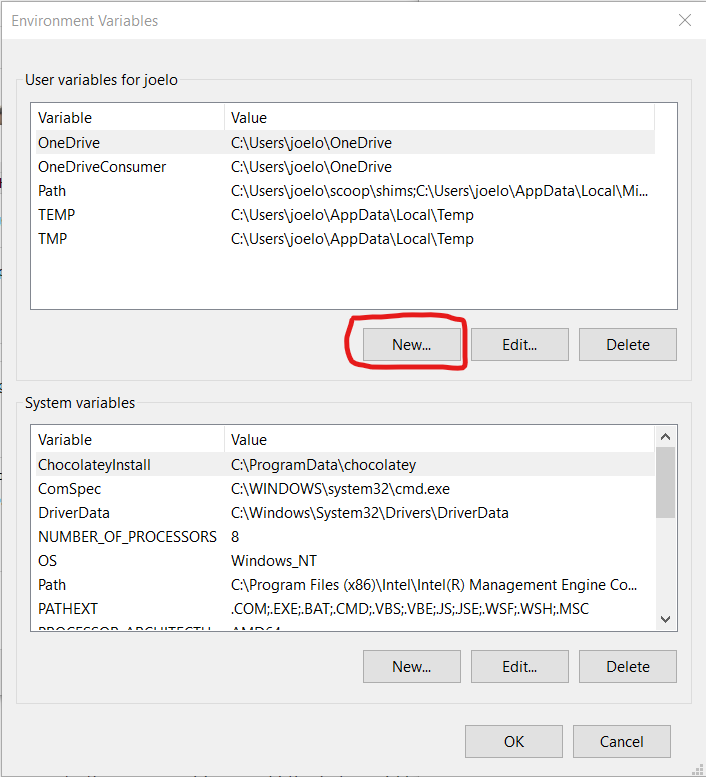
And type in R_USER as the “Variable name” and C:\Users\username as the “Variable value”, replacing username with your actual user name (if you don’t know your user name, look at the top of the screenshot above where it says “User variables for your_username”):
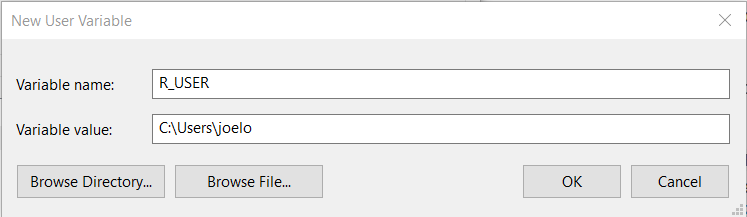
Click “OK” on all of the three windows we opened above and you’re done! If you open RStudio and R from terminal and type
.libPaths()
both should return the same values, e.g.
"C:/Users/joelo/R/win-library/4.0" "C:/Program Files/R/R-4.1.1/library"
Rtools#
Windows users will also need to install Rtools, which will allow you to use external libraries. Go to http://cran.r-project.org/bin/windows/Rtools/ and download the latest version (e.g., Rtools40.exe). After the download has finished, run the installer with the default configuration. Do not follow the Rtools’ website instructions for “Putting Rtools on the PATH”. RStudio will put Rtools on the PATH automatically when it is needed.
To test if you’re installation was successful, open RStudio and type the following into the Console:
install.packages("jsonlite", type = "source")
If the jsonlite package installs without errors, Rtools is setup correctly.
Essential R packages#
Next, install the key R packages needed for the start of MDS program, by opening up RStudio and typing the following into the R console inside RStudio:
install.packages(c('tidyverse', 'blogdown', 'xaringan', 'renv', 'devtools', 'usethis'))
If you get a prompt asking if you want to install packages that need compilation from sources, click “Yes”.
Note: we will use many more packages than those listed above across the MDS program, however we will manage these using the
renvpackage manager (which you will learn about in DSCI 521: Platforms for Data Science).
IRkernel#
The IRkernel package is needed to make R work in Jupyter notebooks. To enable this kernel in the notebooks, open R from a terminal and run the setup via the following two commands:
install.packages('IRkernel')
IRkernel::installspec()
When asked to select a mirror, pick one at a location close to where you live for faster downloads.
Note that you cannot use RStudio for this step because it will not be able to find the jupyter installation. R from terminal will since the correct PATH for jupyter is set when the terminal is launched.
To see if you were successful, try running JupyterLab and check if you have a working R kernel. To launch the JupyterLab type the following in the terminal:
jupyter lab
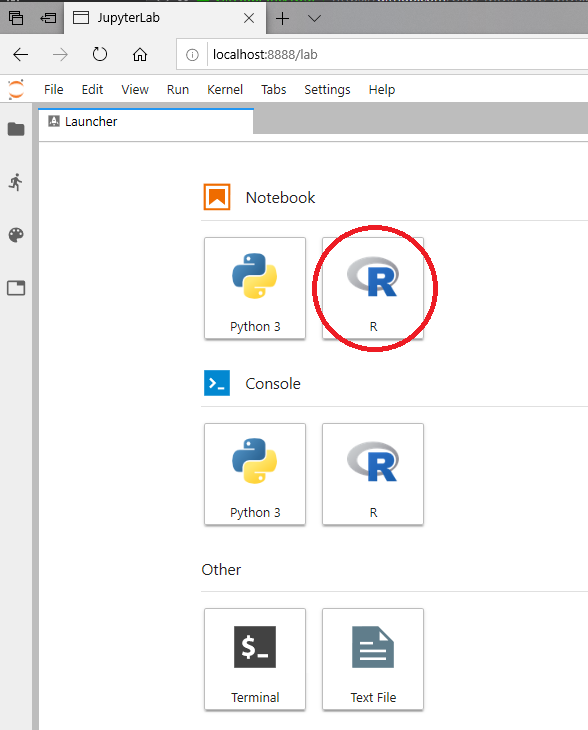
A browser should have launched and you should see a page that looks like the screenshot below. Now click on “R” notebook (circled in red on the screenshot below) to launch an JupyterLab with an R kernel.
Sometimes a kernel loads, but doesn’t work as expected. To test whether your installation was done correctly now type library(tidyverse) in the code cell and click on the run button to run the cell. If your R kernel works you should see something like the image below:

To improve the experience of using R in JupyterLab,
we will add an extension that allows us to setup keyboard shortcuts for inserting text
(thanks to former MDS student Ryan Homer for developing this extension!).
By default,
it creates shortcuts for inserting two of the most common R operators: <- and %>%.
Run the following from terminal to install the extension:
jupyter labextension install @techrah/text-shortcuts
jupyter lab build
To check that the extension is working,
open JupyterLab,
launch an R notebook,
and try inserting the operators by pressing Alt + - or Shift + Ctrl + m, respectively.
LaTeX#
We will install the lightest possible version of LaTeX and it’s necessary packages as possible so that we can render Jupyter notebooks and R Markdown documents to html and PDF. If you have previously installed LaTeX, please uninstall it before proceeding with these instructions.
First, open RStudio and run the following commands to install the tinytex package and setup tinytex:
install.packages('tinytex')
tinytex::install_tinytex()
Note that you might see two error messages regarding lua during the installation, you can safely ignore these, the installation will complete successfully after clicking “OK”.
You can check that the installation is working by opening a terminal and asking for the version of latex:
latex --version
You should see something like this if you were successful:
pdfTeX 3.14159265-2.6-1.40.21 (TeX Live 2020)
kpathsea version 6.3.2
Copyright 2020 Han The Thanh (pdfTeX) et al.
There is NO warranty.  Redistribution of this software is
covered by the terms of both the pdfTeX copyright and
the Lesser GNU General Public License.
For more information about these matters, see the file
named COPYING and the pdfTeX source.
Primary author of pdfTeX: Han The Thanh (pdfTeX) et al.
Compiled with libpng 1.6.37; using libpng 1.6.37
Compiled with zlib 1.2.11; using zlib 1.2.11
Compiled with xpdf version 4.02
The above is all we need to have LaTeX work with R Markdown documents, however for Jupyter we need to add several more packages. Before we do this, please sign out of Windows and back in again in order for the Git Bash terminal to be able to find the location of TinyTex.
When you sign back in, install the additional LaTeX packages needed for Jupyter by pasting the following into the new terminal instance and press enter: by pasting the following:
tlmgr.bat install eurosym \
  adjustbox \
  caption \
  collectbox \
  enumitem \
  environ \
  fp \
  jknapltx \
  ms \
  parskip \
  pgf \
  rsfs \
  tcolorbox \
  titling \
  trimspaces \
  ucs \
  ulem \
  upquote
To test that your latex installation is working with jupyter notebooks,
launch jupyter lab from a terminal and open either a new notebook
or the same one you used to test IRkernel above.
Go to File -> Export notebook as... -> Export Notebook to PDF.
If the PDF file is created,
your LaTeX environment is set up correctly.
Make#
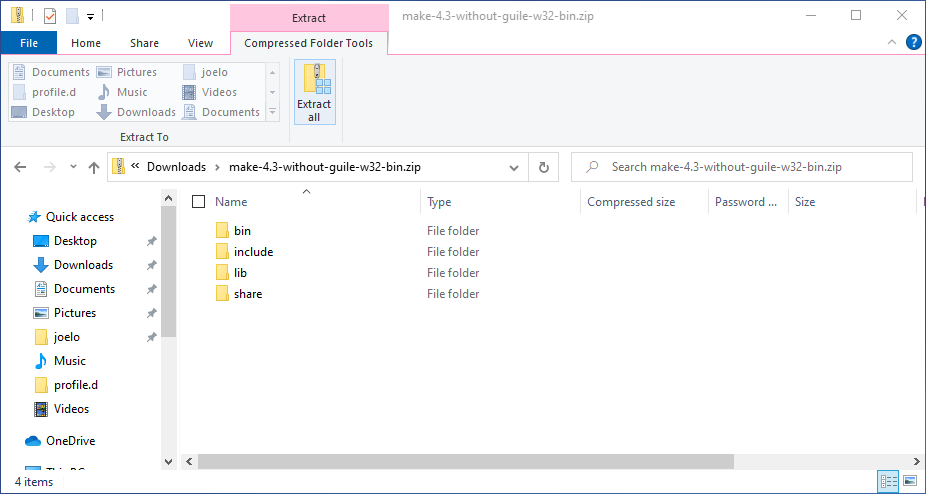
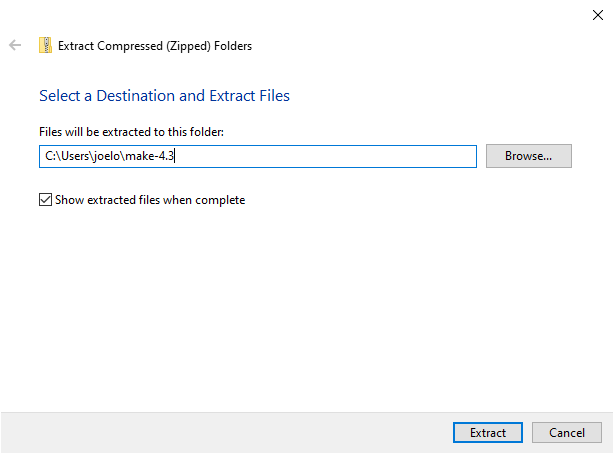
Later in the program, we will be using make to automate our analysis scripts. Download make from this URL. Click on the downloaded zip-file to open it in the File Explorer and click the button in the “Extract” tab that reads “Extract all”. Change the extract location to C:\Users\YOUR_USERNAME\make-4.3 (substituting in your actual username instead of YOUR_USERNAME) and click “Extract”. See the screenshots below if you’re unsure what to click.
Next we need to add make’s bin folder to our PATH so that we can use the command make from the terminal (like we did with R earlier). Open the bash configuration file with VS Code again by pasting this into a terminal:
code ~/.bash_profile
And replace the section that reads:
# Add R and Rscript to path (remember to update the text below to make sure it's actually the version you install!)
export PATH="/c/Program Files/R/R-4.1.1/bin/x64":$PATH
with the following to prepend make’s bin folder to the PATH
(note that ${USERNAME} below will be automatically expanded to your actual username by bash,
so you don’t need to replace it manually.
# Add R, Rscript, and Make to path (remember to update the text below to make sure it's actually the version you install!)
export PATH="/c/Users/${USERNAME}/make-4.3/bin":"/c/Program Files/R/R-4.1.1/bin/x64":$PATH
Then save the file and exit VS Code. Launch a new terminal and run
make --version
which should return something like
GNU Make 4.3
Built for Windows32
Copyright (C) 1988-2020 Free Software Foundation, Inc.
License GPLv3+: GNU GPL version 3 or later <http://gnu.org/licenses/gpl.html>
This is free software: you are free to change and redistribute it.
There is NO WARRANTY, to the extent permitted by law.
PostgreSQL#
We will be using PostgreSQL as our database management system. You can download PostgreSQL 12.4 from here (do not select version 13). Follow the instructions for the installation. In the password page, type whatever password you want, but make sure you’ll remember it later. For all the other options, use the default. You do not need to run “StackBuilder” at the end of the installation (if you accidentally launch the StackBuilder, click “cancel”, you don’t need to check any boxes).
To test if the installation was successful open the SQL Shell app from the Start menu. You will be asked to setup your configuration, accept the default value (the one within square brackets) for the first four values by pressing enter four times, then type in your password and press enter one last time. It should look like this if it is working correctly:

Docker#
You will use Docker to create reproducible, sharable and shippable computing environments for your analyses. For this you will need a Docker account. You can sign up for a free one here.
After signing-up and signing into the Docker Store, go here and click on the “Get Stable” button on the right hand side of the screen. Then follow the installation instructions on that screen to install the stable version.
After installation (Docker will make you sign out to finish installing), launch a terminal and type
docker run hello-world
which should output something like this:
Unable to find image 'hello-world:latest' locally
latest: Pulling from library/hello-world
0e03bdcc26d7: Pulling fs layer
0e03bdcc26d7: Verifying Checksum
0e03bdcc26d7: Download complete
0e03bdcc26d7: Pull complete
Digest: sha256:49a1c8800c94df04e9658809b006fd8a686cab8028d33cfba2cc049724254202
Status: Downloaded newer image for hello-world:latest
Hello from Docker!
This message shows that your installation appears to be working correctly.
To generate this message, Docker took the following steps:
 1. The Docker client contacted the Docker daemon.
 2. The Docker daemon pulled the "hello-world" image from the Docker Hub.
    (amd64)
 3. The Docker daemon created a new container from that image which runs the
    executable that produces the output you are currently reading.
 4. The Docker daemon streamed that output to the Docker client, which sent it
    to your terminal.
To try something more ambitious, you can run an Ubuntu container with:
 $ docker run -it ubuntu bash
Share images, automate workflows, and more with a free Docker ID:
 https://hub.docker.com/
For more examples and ideas, visit:
 https://docs.docker.com/get-started/
VS Code extensions#
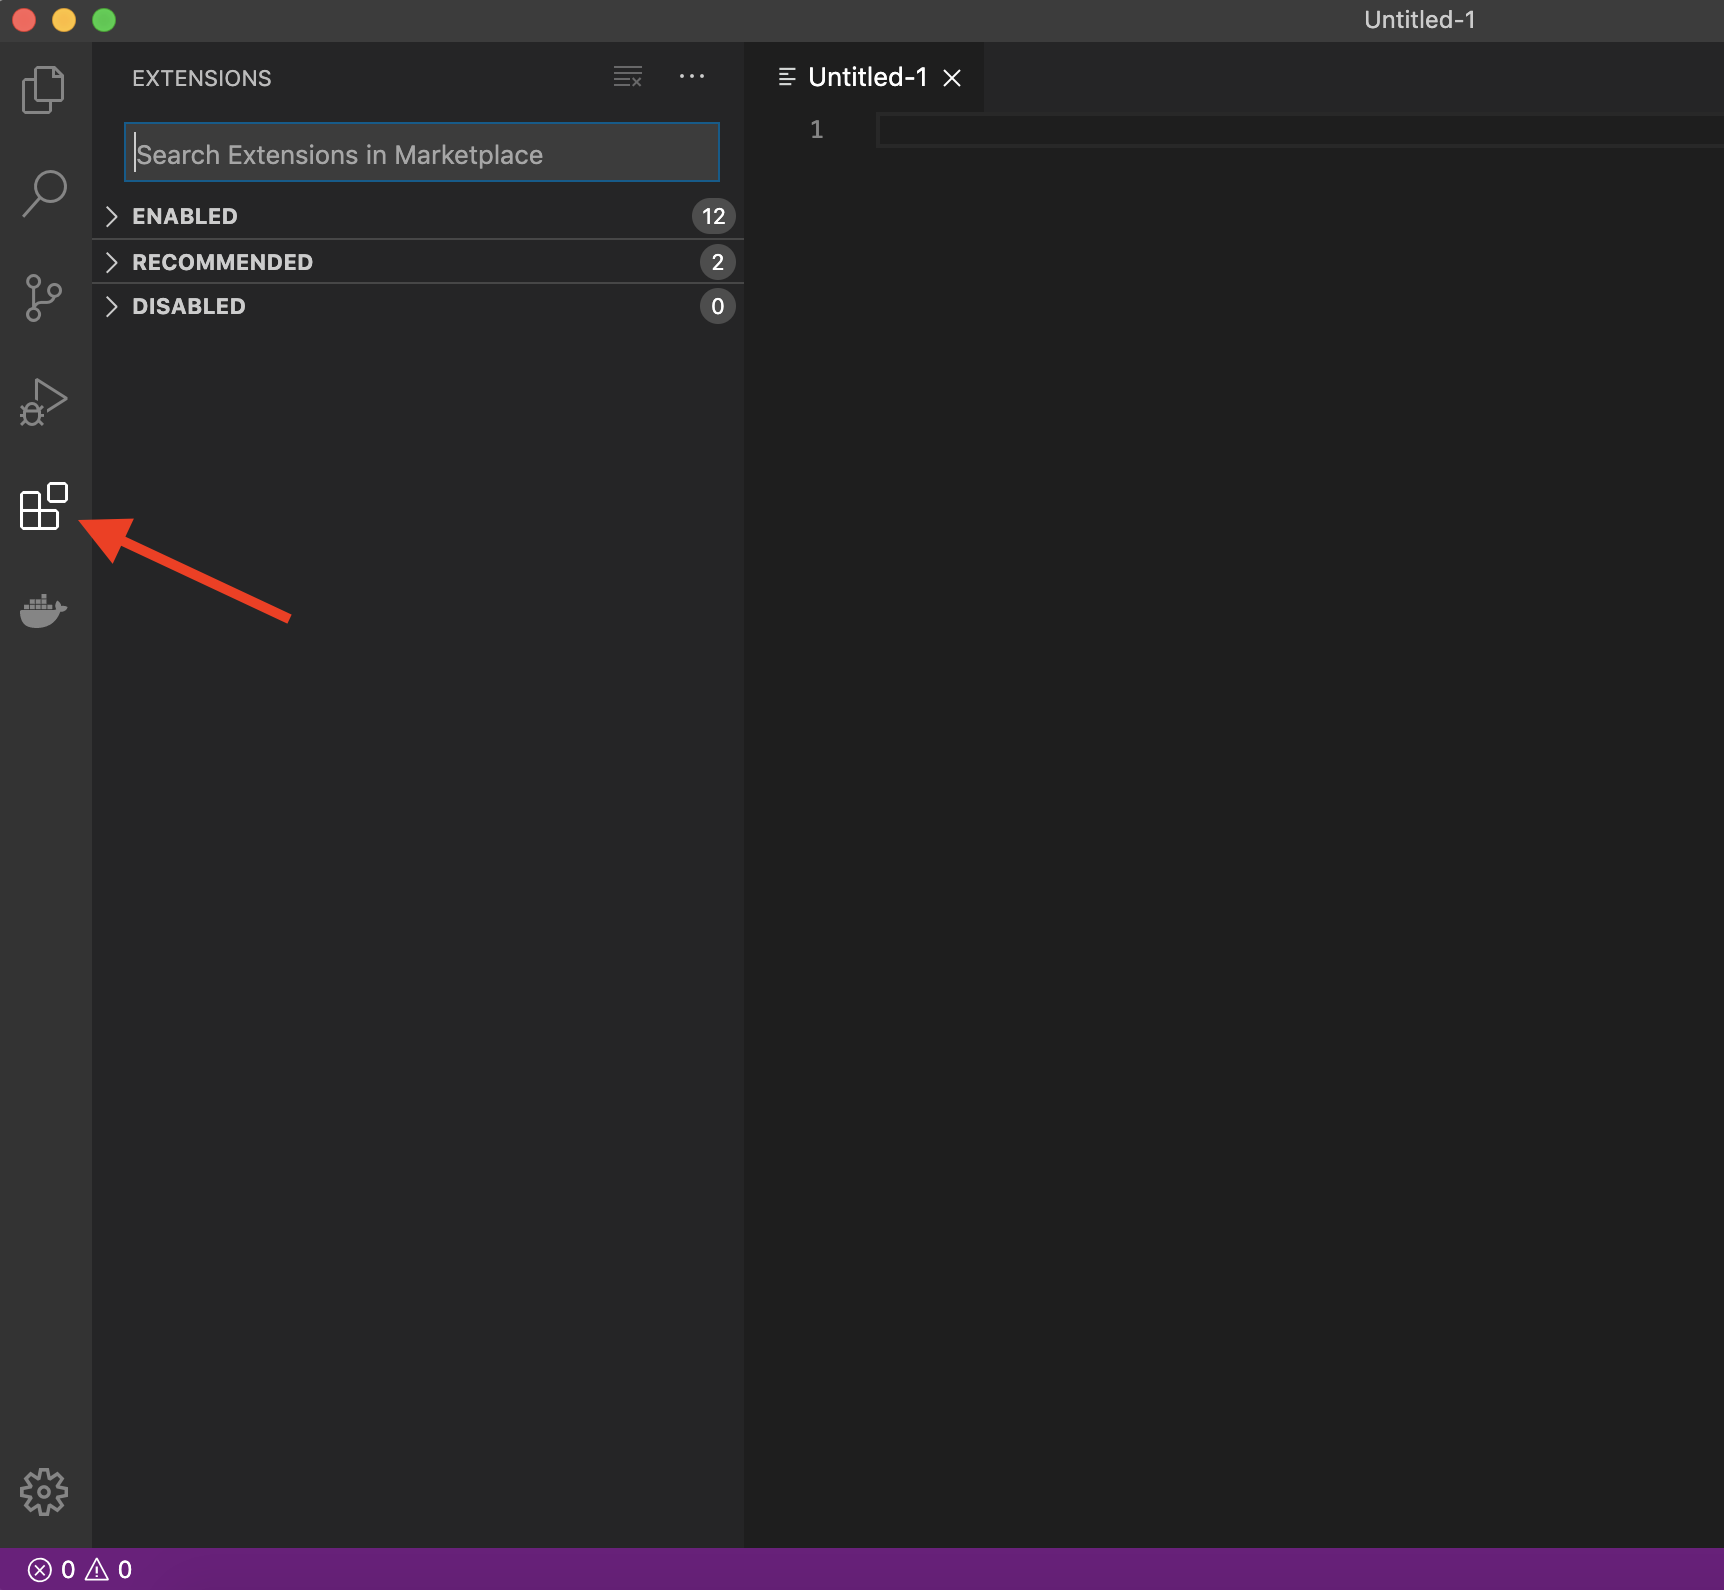
The real magic of VS Code is in the extensions that let you add languages, debuggers, and tools to your installation to support your specific workflow. From within VS Code you can open up the Extension Marketplace to browse and install extensions by clicking on the Extensions icon in the Activity Bar indicated in the figure below.
To install an extension, you simply search for it in the search bar, click the extension you want, and then click “Install”. There are extensions available to make almost any workflow or task you are interested in more efficient! Here we are interested in setting up VS Code as a Python IDE. To do this, search for and install the following extensions:
Python (everything Python: notebooks, debugging, linting, formatting, etc.)
markdownlint (markdown linting and style checking extension)
GitLens (powerful extension that extends VS Code’s native git capabilities)
Docker (easily use Docker from VS Code)
(Optional) Material Theme and/or Predawn Theme Kit (additional colour themes to choose from)
(Optional) Material Icon Theme (great-looking custom file icons!)
(Optional) Bracket Pair Colorizer 2 (add colour to help distinguish your brackets: (), [], {})
This video tutorial is an excellent introduction to using VS Code in Python.
Improving the bash configuration#
To improve your experience using bash, we recommend appending a few lines to the end of your bash configuration file. This is optional, but makes it easier to use the TAB key for autocompletion and improves how bash handles the command history (we will talk more about these topics during class). First, open the configuration file:
code ~/.bash_profile
Then paste the following at the end of the file (make sure not to overwrite any existing lines) and save it afterwards:
# TAB completion configuration
# TAB completion ignores case
bind "set completion-ignore-case on"
# Require only one instead of two TAB presses before showing matches
bind "set show-all-if-ambiguous on"
# If there are multiple matches for completion, cycle through them with TAB
bind 'TAB':menu-complete
# Perform partial completion on the first Tab press,
# only start cycling full results on the second Tab press
bind "set menu-complete-display-prefix on"

# History configuration
# Cycle through history based on characters already typed on the line
bind '"\e[A":history-search-backward'
bind '"\e[B":history-search-forward'
# Append to the history file, don't overwrite it.
shopt -s histappend
# Write commands to history one-by-one right after they are executed
# instead of all together when the terminal is closed.
# Make new terminals see all commands run in currently open terminals and
# prepend a newline to the prompt string to separate it from the last command's output
PROMPT_COMMAND='history -a; echo'
# Increase history size
HISTSIZE=50000
HISTFILESIZE=50000

# Aliases
# Note that aliases only are in effect when you are using the shell interactively
# (e.g. opening the Git Bash terminal and typing or pasting commands).
# If you run a bash script or makefile,
# the original command is used instead of your alias.
# Run Python and Docker in compatibility mode when started from an interactive shell
alias python="winpty python"
alias docker="winpty docker"
# `man` function to display help messages with a pager as on Unix
man() {
    $1 --help | less
}