macOS Software Stack Part 2
Contents
macOS Software Stack Part 2#
R, XQuartz, IRkernel, and RStudio#
R is another programming language that we will be using a lot in the MDS program. We will use R both in Jupyter notebooks and in RStudio.
R#
Go to https://cran.r-project.org/bin/macosx/ and download the latest version of R for Mac (Should look something like this: R-3.6.1.pkg). Open the file and follow the installer instructions.
After installation, in Terminal type the following to ask for the version:
R --version
You should see something like this if you were successful:
R version 4.1.1 (2021-08-10) -- "Kick Things"
Copyright (C) 2021 The R Foundation for Statistical Computing
Platform: x86_64-apple-darwin20.4.0 (64-bit)

R is free software and comes with ABSOLUTELY NO WARRANTY.
You are welcome to redistribute it under the terms of the
GNU General Public License versions 2 or 3.
For more information about these matters see
https://www.gnu.org/licenses/.
Note: Although it is possible to install R through conda, we highly recommend not doing so. In case you have already installed R using conda you can remove it by executing
conda uninstall r-base.
XQuartz#
Some R packages rely on the dependency XQuartz which no longer ships with macOS, thus we need to install it separately. Download it from here: https://www.xquartz.org/ and follow the installation instructions.
RStudio#
Download the macOS Desktop version of RStudio Desktop from https://rstudio.com/products/rstudio/download/preview/. Open the file and follow the installer instructions.
To see if you were successful, try opening RStudio by clicking on its icon (from Finder, Applications or Launchpad). It should open and look something like this picture below:

Essential R packages#
Next, install the key R packages needed for the start of MDS program, by opening up RStudio and typing the following into the R console inside RStudio:
install.packages(c('tidyverse', 'blogdown', 'xaringan', 'renv', 'usethis', 'devtools'))
Note: we will use many more packages than those listed above across the MDS program, however we will manage these using the
renvpackage manager (which you will learn about in DSCI 521: Platforms for Data Science).
IRkernel#
The IRkernel package is needed to make R work in Jupyter notebooks. To enable this kernel in the notebooks, install by pasting the following command into the RStudio Console:
install.packages('IRkernel')
Next, open a terminal and type the following
(you can’t use RStudio for this step
since it doesn’t honor $PATH changes in ~/.z_profile)
R -e "IRkernel::installspec()"
To see if you were successful, try running JupyterLab and check if you have a working R kernel. To launch the JupyterLab type the following in Terminal:
jupyter lab
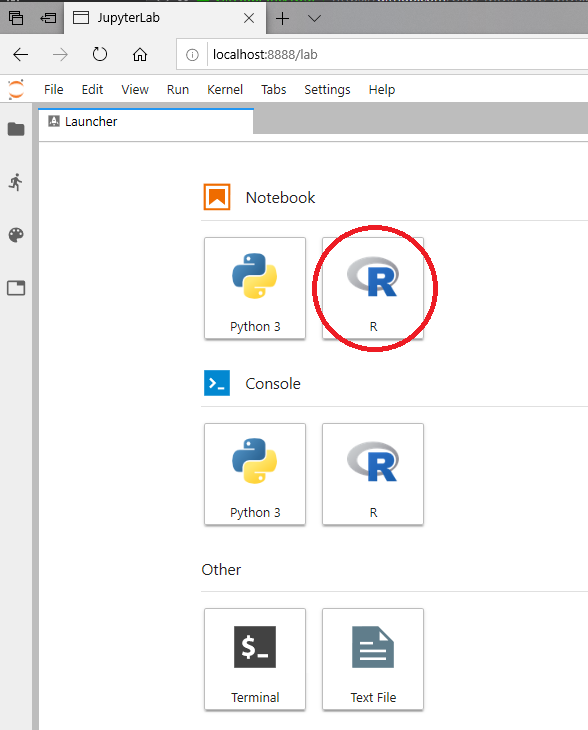
A browser should have launched and you should see a page that looks like the screenshot below. Now click on “R” notebook (circled in red on the screenshot below) to launch an JupyterLab with an R kernel.
Sometimes a kernel loads, but doesn’t work as expected. To test whether your installation was done correctly now type library(tidyverse) in the code cell and click on the run button to run the cell. If your R kernel works you should see something like the image below:

To improve the experience of using R in JupyterLab,
we will add an extension that allows us to setup keyboard shortcuts for inserting text
(thanks to former MDS student Ryan Homer for developing this extension!).
By default,
it creates shortcuts for inserting two of the most common R operators: <- and %>%.
Run the following from terminal to install the extension:
jupyter labextension install @techrah/text-shortcuts
jupyter lab build
To check that the extension is working,
open JupyterLab,
launch an R notebook,
and try inserting the operators by pressing Alt + - or Shift + Command + m, respectively.
LaTeX#
We will install the lightest possible version of LaTeX and it’s necessary packages as possible so that we can render Jupyter notebooks and R Markdown documents to html and PDF. If you have previously installed LaTeX, please uninstall it before proceeding with these instructions.
First, open RStudio and run the following commands to install the tinytex package and setup tinytex:
install.packages('tinytex')
tinytex::install_tinytex()
Note: You might be asked to enter your password during installation. If you see an error message towards the end of the installation telling you that
/usr/local/binis not writeable, you will need to open a terminal and run the following two commands before proceeding:sudo chown -R $(whoami):admin /usr/local/bin ~/Library/TinyTeX/bin/x86_64-darwin/tlmgr path add
You can check that the installation is working by opening a terminal and asking for the version of latex:
latex --version
You should see something like this if you were successful:
pdfTeX 3.14159265-2.6-1.40.21 (TeX Live 2020)
kpathsea version 6.3.2
Copyright 2020 Han The Thanh (pdfTeX) et al.
There is NO warranty.  Redistribution of this software is
covered by the terms of both the pdfTeX copyright and
the Lesser GNU General Public License.
For more information about these matters, see the file
named COPYING and the pdfTeX source.
Primary author of pdfTeX: Han The Thanh (pdfTeX) et al.
Compiled with libpng 1.6.37; using libpng 1.6.37
Compiled with zlib 1.2.11; using zlib 1.2.11
Compiled with xpdf version 4.02
The above is all we need to have LaTeX work with R Markdown documents, however for Jupyter we need to add several more packages. Do this by opening a terminal and copying the following there press enter:
tlmgr install eurosym \
  adjustbox \
  caption \
  collectbox \
  enumitem \
  environ \
  fp \
  jknapltx \
  ms \
  parskip \
  pgf \
  rsfs \
  tcolorbox \
  titling \
  trimspaces \
  ucs \
  ulem \
  upquote
To test that your latex installation is working with jupyter notebooks,
launch jupyter lab from a terminal and open either a new notebook
or the same one you used to test IRkernel above.
Go to File -> Export notebook as... -> Export Notebook to PDF.
If the PDF file is created,
your LaTeX environment is set up correctly.
PostgreSQL#
We will be using PostgreSQL as our database management system. You can [download PostgreSQL 12.4 from here (do not select version 13). Follow the instructions for the installation. In the password page, type whatever password you want, but make sure you’ll remember it later. For all the other options, use the default. You do not need to run “StackBuilder” at the end of the installation (if you accidentally launch the StackBuilder, click “cancel”, you don’t need to check any boxes).
To test if the installation was successful open the SQL Shell app from the LaunchPad or applications directory. You will be asked to setup your configuration, accept the default value (the one within square brackets) for the first four values by pressing enter four times, then type in your password and press enter one last time. It should look like this if it is working correctly:

Docker#
You will use Docker to create reproducible, sharable and shippable computing environments for your analyses. For this you will need a Docker account. You can sign up for a free one here.
After signing-up and signing into the Docker Store, go here: https://store.docker.com/editions/community/docker-ce-desktop-mac and click on the “Get Docker” button on the right hand side of the screen. Then follow the installation instructions on that screen to install the stable version.
To test if Docker is working, after installation open the Docker app by clicking on its icon (from Finder, Applications or Launchpad). Next open Terminal and type the following:
docker run hello-world
you should see something like this if you were successful:
Unable to find image 'hello-world:latest' locally
latest: Pulling from library/hello-world
1b930d010525: Pull complete
Digest: sha256:451ce787d12369c5df2a32c85e5a03d52cbcef6eb3586dd03075f3034f10adcd
Status: Downloaded newer image for hello-world:latest

Hello from Docker!
This message shows that your installation appears to be working correctly.

To generate this message, Docker took the following steps:
 1. The Docker client contacted the Docker daemon.
 2. The Docker daemon pulled the "hello-world" image from the Docker Hub.
    (amd64)
 3. The Docker daemon created a new container from that image which runs the
    executable that produces the output you are currently reading.
 4. The Docker daemon streamed that output to the Docker client, which sent it
    to your terminal.

To try something more ambitious, you can run an Ubuntu container with:
 $ docker run -it ubuntu bash

Share images, automate workflows, and more with a free Docker ID:
 https://hub.docker.com/

For more examples and ideas, visit:
 https://docs.docker.com/get-started/
Attributions#
UBC STAT 545 licensed under the CC BY-NC 3.0.